Showing posts with label Filters. Show all posts

Tuesday, January 14, 2014

Bypassing Edit Group Mode

In the example below I've grouped and pinned the as-built model... proceeded with demoing a door (infilled on the right) and wanted to show the finishes as all new on this existing wall.

Phase filters wouldn't get me there, but Parts works if you're at a stage where you don't mind managing parts on a project.

In this example I choose to apply a view filter (by project parameter) to get the proposed plan graphics the way I needed to for many remodel scenarios while keeping the model simple for design changes that were fluid. But in Revit 2013 I've always had to Edit Group to apply the parameters, and I've always preferred to bypass Edit Group Mode (like I can for "phase created" and "phase demolished") for a number of reasons, while still taking advantage of groups.

Here is a new feature in Revit 2014 that helps to make this more possible.

If you've grouped your model in part or in whole you might notice many parameters are disabled and can not be edited without first entering Edit Group mode. Well... in Revit 2014 you can now Manage.. Project Parameters... and change a setting that reads "values are aligned per group type" to "values can vary by group instance." Now TAB to an element that is part of the group and the parameters should be available to you in the Properties window.

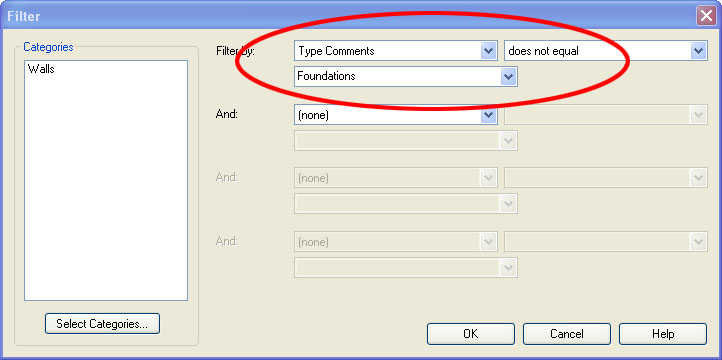
This is pretty handy if entering Edit Group mode (ex. for a large model group) every time you want to edit parameters (ex. to benefit view filters - image below) is a hassle.

Existing stud wall - New infill wall - New finishes
No Parts applied to this example
Existing and Infill wall are same wall type

Thursday, August 20, 2009

Additive Views vs. Subtractive Views

Common Problem: When I place an electrical fixture or other family category it pops up automatically in other views I would rather not see it in.

Reason: In the default Revit tempate almost every category is unnecessarily turned on in all views so the same family shows up everywhere.

Solution: Create Additive Views instead of Subtractive Views for family categories that are only used in one or two views. By that I mean, start with most family categories turned off in your new view's visibility/graphics and gradually add the categories that you want to see.

Extra Tip: If you want future new views to be additive by default, create a view template. Then, when you apply the template to a view, check the option that reads "Apply automatically to new views of the same type."

Wednesday, July 29, 2009

Instance Parameters: The Double Agent

This is going to be particularly helpful to those of you working on large projects. Some of you may already be aware of it, but I haven't seen it documented anywhere so here goes...

I call this technique the Double Agent because the Instance Parameters discussed here will temporarily act like Type Parameters under the right conditions. Why would I want an Instance Parameter to act like a Type Parameter? you ask. Well, quite often, but not always we want to apply the same Instance Parameter value (like a comment that is repeated for MOST instances of a Family Type) to many of the same Doors, Windows, Sheets, or other families. Comments are typically Instance Parameters that you have to change one at a time. But I don't want to change comments one at a time when there are so many of the same comment value. I want them to update once and simultaniously like a Type Parameter would, without having to use a Type Parameter (because I may still want one or two comment values to remain unique. Well, how do you do it? The Answer: With Schedules

Here is the procedure. Go to your door schedule for example.


You'll notice that I have four door types (71,66,17,64). I need to add the Remark 1hr rated to types 66 & 64. Rather than enter the value one field at a time for the Instance Parameter called Remark, lets add the value to all 8 fields once and simultaniously. Here's how.

Go to View Properties... Sorting Grouping... Now make a mental note (or write it down if you wish) of the current Sorting/Grouping settings because, like a good double agent, you're going to have to restore the schedule to its original identity when we're all done. Now change the setting to what you see below.

You can isolate the From Room: Name (or Type Mark parameter). It is very important to uncheck the Itemize every instance option. This is what you'll see.

Now Type in the Remark 1HR Rated for all doors without a room name... then change the Sorting/Grouping setting back to their original state and You'll have added the Value 1HR Rated to the Instance Parameter Remarks for all doors without a room name.


These are the rules of the game: You have to sort the schedule by some Type Parameter or by some Instance Parameter with equal values already present.

Now that I have the value 1HR RATED for all of the 1HR doors, lets say I want to change the value to 1.5HR RATED. Just isolate the REMARKS parameter from the Sorting/Grouping settings and exchange the old value for the new value.

So once again, why not just make your Instance Parameter a Type Parameter? Because the Instance Parameter value you choose may not always apply to every instance of a Family Type. This is just a custom way to update multiple fields once and simultaniously.

I hope you'll enjoy exploring the many applications of The Double Agent technique.

Friday, June 26, 2009

Filter Unplaced or Unenclosed Items

Every once in a while I discover something I didn't know was there. It appears this feature was added in Revit 2009.

After you've created a Room or Area Schedule and populated it with rooms/areas you have the option of filtering unplaced or unenclosed Rooms/Areas. The three options are: Show all, Hide unplaced, and Isolate unplaced.

Tuesday, March 06, 2007

Open, Sesame

When you place an existing door or window in an existing wall and then demo the door or window in the new construction phase Revit automatically places an infill wall to replace the door or window. You can then change this infill wall type to any wall type you like, but without a workaround you really can't get rid of the infill wall. We frequently run into situations where we want to demo a door but leave the opening intact. I have seen this discussed at length on AUGI and there are many workarounds but I think the workaround I found today (One Thousand and One Nights later) is an easier option.

Revit has had a Filter function since release 9. By adding a Comment to any instances of infilling walls and filtering out the visibility of the walls based on the Comment added you can hide infilling walls from any of your views.
  • Place an existing wall and door in any existing plan view.
  • Demo your door in the new construction phase.
  • Select the infill wall and add a value to the Comments instance parameter under element properties.
  • Go to the Filters tab in the Visibility/Graphic Overides of your new construction view.
  • Define a new filter for Walls and select Filter by: Comments... equals. Type in the value you used in the Comments field earlier.
  • Insert your new Filter into this view's Visibility/Graphics and turn off its visibility. Do the same for all views where you would like to hide infill walls.
  • Unjoin the geometry of the infill wall and its host wall if you can't see where they meet in 3D or elevation views.

Monday, March 05, 2007

Filtering View Specific Content

Do you want to know if Text Backgrounds used in a view are opaque or transparent?
Are you trying to find hidden filled regions in a view?
Are you having trouble distinguishing detail lines from model lines in a view?

Well, the easiest way to separate view specific content from model content in a view is to place a temporary filled region with a Solid Fill Pattern that covers the entire view (choose a neutral color). Then just select the filled region and Send To Back. All view specific content will pop out and all model content will be hidden behind your Filled Region.

However, if you want to know where the Linework Tool was used you'll have to resort to selecting the Linework Tool... By Category... and floating your mouse over the model to "scan" for where it may have been used. Lines will highlight when you roll your mouse over them if the Linework Tool was infact used.

Thursday, December 21, 2006

Content Highway Beta Released Today

In December 2005 Marek Brandstatter announced the development of Content Highway Desktop, a content management solution for Autodesk Revit that allows you to manage Revit family (RFA) files on your computer and optionally publish them to Content Highway Web for sharing and collaboration.

Many AUGI members were anxiously anticipating the release of this software.

Content Highway was made available today. Download the beta here.

Saturday, July 22, 2006

Stepped Foundation Plans

We often have split level projects and we've had a lot of trouble isolating the stem walls and footings from the rest of the model for use in a foundation plan... that is until Revit 9.0 came along. You can now use Revit Filters to isolate your foundation from the rest of your project.

1. Duplicate your Basic Wall: Foundation - 12" Concrete for each stem wall and footing size you need. You could use a Continuous Footing for your footings but we avoid Continuous Footings because their intersections don't clean up as nicely as Basic Walls.

2. Add the Type Comment "Foundations" for each of your new walls. Go to the wall's properties... Edit/New... Type Comments.

3. Set up a filter... Settings... Filters... New... call it Foundations... Check Walls... Filter by Type Comments... Does not equal... Foundations... select OK to exit.

4. Go to your foundation floor plan and type VG. Goto Filters... Insert... Foundations... and uncheck Visibility so that only walls with the Type Comment "Foundations" will show.

5. In Visibility/Graphics go to Model Categories and uncheck everything except Detail Items and Walls.

The Visibility of your view is now set to show only your stem walls, footings, and annotations. You can use the Linework tool to change your footings to dashed lines or add another Filter for Footings. You may not want to use the method described above to build your foundation plans but I thought I'd share a use for Revit's new Filter function.

You can also use phases or worksets to isolate foundations, but we prefer the filter method.