Do you want to add tile pavers on a slab, 2x6 joists in a section drawing, or wood shake to a roof section? The repeating Detail Tool will draft detail components along a line you define at spacing you define. Go to Drafting... Repeating Detail... Edit/New... Duplicate. Here you can add new Repeating Details to your project. You must first load the detail component you want to repeat.
Any Revit Text you place in a Detail Component will not show up when you go to use the component in a repeating detail. If you want to add text to your repeating detail you'll have to first import AutoCAD text into your detail component.
Monday, April 17, 2006


Thursday, April 13, 2006
Beginner Bloopers
Nested Families: We've had window families that were getting to be upwards of 2 MBs making the project file huge (over 140MB). On average window and door families should be 140kb - 400kb (we do have a few ornate doors that are larger) . It turns out one of our users was loading window families into window families into window families. Make sure you purge unused when you're done with your family.
Levels: You shouldn't have to add a lot of levels when they are only inches apart. Too many levels clutter elevations and sections so keep an eye on how your users utilize levels. Make sure your users know that they can OFFSET heights of objects. Levels can be difficult to modify later once they've been established.
Paint Tool: The Paint tool (PT) is for applying materials and patterns to a model surface. You can not import a dwg file (or draw a boundary using detail lines) and expect the paint tool to fill the area within the drawn boundary. The Paint tool is not like photoshop's Paint Bucket Tool.
Sitework - Roads: When I was learning how to build sitework I was using the Split Surface tool to create roads and walkways. It didn't occur to me at the time to create subregions instead. Use subregions to distinguish asphalt roads and walkways from topography. Creating roads and walkways with the split surface tool is a bad idea. Once you split a surface, editing the boundary of that split surface becomes very difficult and often results in "can not triangulate surface" error messages.
Levels: You shouldn't have to add a lot of levels when they are only inches apart. Too many levels clutter elevations and sections so keep an eye on how your users utilize levels. Make sure your users know that they can OFFSET heights of objects. Levels can be difficult to modify later once they've been established.
Paint Tool: The Paint tool (PT) is for applying materials and patterns to a model surface. You can not import a dwg file (or draw a boundary using detail lines) and expect the paint tool to fill the area within the drawn boundary. The Paint tool is not like photoshop's Paint Bucket Tool.
Sitework - Roads: When I was learning how to build sitework I was using the Split Surface tool to create roads and walkways. It didn't occur to me at the time to create subregions instead. Use subregions to distinguish asphalt roads and walkways from topography. Creating roads and walkways with the split surface tool is a bad idea. Once you split a surface, editing the boundary of that split surface becomes very difficult and often results in "can not triangulate surface" error messages.
Saturday, April 01, 2006
Door & Window Tips
There is a lot one can learn about the family editor. I'll just briefly describe what it is and what tips will help you get started with creating custom doors and windows.
The family editor is where one models complex geometries such as door families, window families, furniture families, custom annotations, fireplaces, etc. The tools available in the family editor are somewhat different than those available in a project file. In a family you can place detail components, symbols, and model lines just as you would in a project file, but you can also place nested families, symbolic lines, and parametric parameters. A nested family is simply a family loaded into another family. If you're in the habit of loading nested families be sure and purge unused nested families before you load a family into your project file (to keep the file size down).
There are two ways to work in the family editor. Create a family file that is separate from the project file (go to File... New... Family) or build an in-place family (go to Modelling... Create). We only use in-place families for some sitework and some building details. Mostly we generate family files. Family files (.rfa) can be saved for use in other projects. Building a library of family files will save you time on future projects.
If you're going to build a door, window, or other family you'll probably want to start with one of the templates Revit offers (go to File... New... Family and choose the appropriate template). These are a few tips I'd recommend:
1. The first place I always go to after starting a door or window family is the Family Type. Here you can change parameters for width and height which are already setup for you. One family file could have many types. A type is defined by its parameter values. If you want one family type to be 3' x 3' and the other to be 3' x 4' then you'll want to create NEW family types and name them according to the parameters that change (size in this case).
2. In a door or window family template select the reference plane that is centered in the family and go to it's properties. You'll notice that the parameter "Is Reference" is called out as "Center (Left/Right)". This is the reference plane that Revit uses when you're dimensioning to the centerline of your doors and windows in plan. Always try to keep this reference plane centered in your family or you'll have problems further down the road when you want to dimension to centerline of door or window. Checking for this is something beginners often overlook to do.
3. In plan view you'll notice that the Exterior and Interior are marked. Always keep in mind which side is which when you're building your window or door. You'll also notice a Flip Control (two blue arrows). Don't delete this annotation as you may want to flip the door or window direction after placing it in your project.
4. If you want your door or window to stretch properly when you change it's width or height in the Family Types first setup reference planes that define the basic geometry of your door or window and dimension them (with parameters if you want them to stretch). Then you should dimension or align your solid shapes to the established reference planes or lines so that the modelled shapes will stretch with the planes. I would recommend you take a look at "Casement 2x3 with Trim.rfa" in the Imperial Library as an example of a window that stretches properly.
5. Always check to see that your family stretches properly in x, y AND z axis. One thing you can do to make sure your door or window will work in walls of differing thicknesses is to select the wall in your family template and change its structure from 6" to maybe 10" (go to the walls Properties... Edit/New... Structure). Checking this behavior is something beginners often overlook to do.
6. If you want the correct width, height, and sill height to show up in the door and window schedules I recommend you dimension these basic parameters in your doors and windows. What happens too often is when a user is in a hurry to make a door or window he/she ignores dimensioning these parameters and the schedule will read whatever width and height are established in Family Types (whether they are right or not). You'll end up with the wrong height and width in your schedule if you don't at least dimension these basic parameters. To assign a parameter to a dimension simply select the dimension and change its Label from "None" to the desired parameter.
For more on families see Working with Autodesk Revit Components
The family editor is where one models complex geometries such as door families, window families, furniture families, custom annotations, fireplaces, etc. The tools available in the family editor are somewhat different than those available in a project file. In a family you can place detail components, symbols, and model lines just as you would in a project file, but you can also place nested families, symbolic lines, and parametric parameters. A nested family is simply a family loaded into another family. If you're in the habit of loading nested families be sure and purge unused nested families before you load a family into your project file (to keep the file size down).
There are two ways to work in the family editor. Create a family file that is separate from the project file (go to File... New... Family) or build an in-place family (go to Modelling... Create). We only use in-place families for some sitework and some building details. Mostly we generate family files. Family files (.rfa) can be saved for use in other projects. Building a library of family files will save you time on future projects.
If you're going to build a door, window, or other family you'll probably want to start with one of the templates Revit offers (go to File... New... Family and choose the appropriate template). These are a few tips I'd recommend:
1. The first place I always go to after starting a door or window family is the Family Type. Here you can change parameters for width and height which are already setup for you. One family file could have many types. A type is defined by its parameter values. If you want one family type to be 3' x 3' and the other to be 3' x 4' then you'll want to create NEW family types and name them according to the parameters that change (size in this case).
2. In a door or window family template select the reference plane that is centered in the family and go to it's properties. You'll notice that the parameter "Is Reference" is called out as "Center (Left/Right)". This is the reference plane that Revit uses when you're dimensioning to the centerline of your doors and windows in plan. Always try to keep this reference plane centered in your family or you'll have problems further down the road when you want to dimension to centerline of door or window. Checking for this is something beginners often overlook to do.
3. In plan view you'll notice that the Exterior and Interior are marked. Always keep in mind which side is which when you're building your window or door. You'll also notice a Flip Control (two blue arrows). Don't delete this annotation as you may want to flip the door or window direction after placing it in your project.
4. If you want your door or window to stretch properly when you change it's width or height in the Family Types first setup reference planes that define the basic geometry of your door or window and dimension them (with parameters if you want them to stretch). Then you should dimension or align your solid shapes to the established reference planes or lines so that the modelled shapes will stretch with the planes. I would recommend you take a look at "Casement 2x3 with Trim.rfa" in the Imperial Library as an example of a window that stretches properly.
5. Always check to see that your family stretches properly in x, y AND z axis. One thing you can do to make sure your door or window will work in walls of differing thicknesses is to select the wall in your family template and change its structure from 6" to maybe 10" (go to the walls Properties... Edit/New... Structure). Checking this behavior is something beginners often overlook to do.
6. If you want the correct width, height, and sill height to show up in the door and window schedules I recommend you dimension these basic parameters in your doors and windows. What happens too often is when a user is in a hurry to make a door or window he/she ignores dimensioning these parameters and the schedule will read whatever width and height are established in Family Types (whether they are right or not). You'll end up with the wrong height and width in your schedule if you don't at least dimension these basic parameters. To assign a parameter to a dimension simply select the dimension and change its Label from "None" to the desired parameter.
For more on families see Working with Autodesk Revit Components
Wednesday, March 29, 2006
Key Plans
Revit does not currently have a Key Plan Tool so this is what we do when we need a Key Plan on our sheets.
1. Export your Base Plan to DWG (just the unit boundaries)
2. Create a Detail Component. File... New... Family... Detail Component.rft
3. Import your Base Plan. File... Import... DWG
4. Add a Yes/No Parameter for each unit or quadrant. Family Types... Add Parameters... Type Yes/No... Set Instance Parameter... give each unit or quadrant a name.
5. Draw Filled regions for each unit or quadrant of your Base Plan and assign each one a Yes/No Parameter. To do this go to the Filled Region's properties and you'll find a Visibility check box. At the far right there is a tiny grey box. Click on it and select your new Yes/No Parameter as the parameter that defines the visiblity. Do this for each filled region.
6. Now load your new Detail Component into a Legend View in your project and set the appropriate scale.
You can now turn on and off each quadrant using the Yes/No Parameters you set up in the element's properties.
1. Export your Base Plan to DWG (just the unit boundaries)
2. Create a Detail Component. File... New... Family... Detail Component.rft
3. Import your Base Plan. File... Import... DWG
4. Add a Yes/No Parameter for each unit or quadrant. Family Types... Add Parameters... Type Yes/No... Set Instance Parameter... give each unit or quadrant a name.
5. Draw Filled regions for each unit or quadrant of your Base Plan and assign each one a Yes/No Parameter. To do this go to the Filled Region's properties and you'll find a Visibility check box. At the far right there is a tiny grey box. Click on it and select your new Yes/No Parameter as the parameter that defines the visiblity. Do this for each filled region.
6. Now load your new Detail Component into a Legend View in your project and set the appropriate scale.
You can now turn on and off each quadrant using the Yes/No Parameters you set up in the element's properties.
Tuesday, March 28, 2006
Model, Symbolic, Detail and Reference Lines
Which one do I use?
Well, when you're in the family editor you can draw symbolic lines, model lines or reference lines.
1. Symbolic lines only show in plan, elevation, or section depending on which view you're in when you draw them. Symbolic lines are typically used to "represent" door and window swings in plan and elevation.
2. Model lines will show in ALL views because they are part of the model. It's not very well documented but (while in the family editor) Detail Components placed perpendicular to a model line will "sweep" along the model line drawn (Search Augi Forums for Ultra Lightweight 3D Models to see an example). We also use model lines as a quick way to "represent detail" in some families.
3. Reference lines are essentially four intersecting reference planes. They can be used when you want to add a door swing angle parameter to your doors. Reference lines and planes should ALWAYS be used when using dimensioned parameters in a family. For more on reference lines and planes read Steve Stafford's Once Upon a Reference Plane.
When you're in the project you can draw detail lines or model lines.
1. Detail lines, like detail components, are view specific or part of the view. Anything you "draft" in a view will not show up in other views unless you copy and paste the elements into other views.
2. Model lines drawn in a project file are like those drawn in the family editor. They will show up in all views because they are part of the model.
To turn model lines into detail lines... select all model lines cut and paste into a filled region sketch. To turn detail lines into model lines... select all detail lines cut and paste into a floor sketch.
Well, when you're in the family editor you can draw symbolic lines, model lines or reference lines.
1. Symbolic lines only show in plan, elevation, or section depending on which view you're in when you draw them. Symbolic lines are typically used to "represent" door and window swings in plan and elevation.
2. Model lines will show in ALL views because they are part of the model. It's not very well documented but (while in the family editor) Detail Components placed perpendicular to a model line will "sweep" along the model line drawn (Search Augi Forums for Ultra Lightweight 3D Models to see an example). We also use model lines as a quick way to "represent detail" in some families.
3. Reference lines are essentially four intersecting reference planes. They can be used when you want to add a door swing angle parameter to your doors. Reference lines and planes should ALWAYS be used when using dimensioned parameters in a family. For more on reference lines and planes read Steve Stafford's Once Upon a Reference Plane.
When you're in the project you can draw detail lines or model lines.
1. Detail lines, like detail components, are view specific or part of the view. Anything you "draft" in a view will not show up in other views unless you copy and paste the elements into other views.
2. Model lines drawn in a project file are like those drawn in the family editor. They will show up in all views because they are part of the model.
To turn model lines into detail lines... select all model lines cut and paste into a filled region sketch. To turn detail lines into model lines... select all detail lines cut and paste into a floor sketch.
Monday, March 27, 2006
View Range
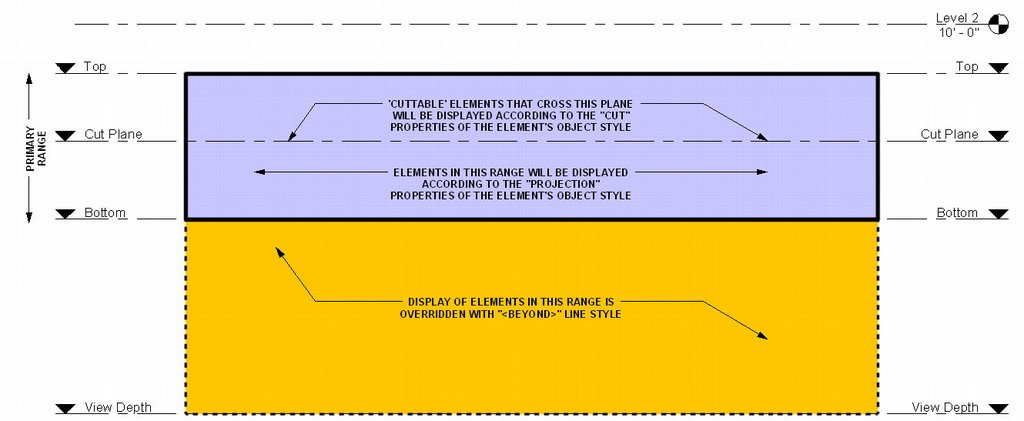
The use of View Range can be a difficult concept to grasp. The image below has been circulated around and explains how CUT, PROJECTION, and BEYOND linestyles are used by the View Range tool found in View Properties (VP) and Plan Region Properties.
CUT and PROJECTION linestyles are controlled globally in Settings... Object Styles and for each view in Visibility/Graphic Overrides (VG). BEYOND linestyle is controlled globally in Settings... Line Styles and for each view in Visibility/Graphic Overrides (VG).
CUT and PROJECTION linestyles are controlled globally in Settings... Object Styles and for each view in Visibility/Graphic Overrides (VG). BEYOND linestyle is controlled globally in Settings... Line Styles and for each view in Visibility/Graphic Overrides (VG).
Tuesday, March 21, 2006
Floor Plan Backgrounds
Let's say you're doing your own mechanical, electrical, structural or other drawings that require a floor plan that is greyed or halftone (a background). We've found two ways to accomplish this:
Display Model As Underlay: The easiest way is to Duplicate your Proposed Floor Plan view (without Detailing) This is done by right clicking on your floor plan view in the project browser and selecting Duplicate. Now go to the View's Properties and you'll notice a Display Model parameter. By default this is set to Normal. Switch this to As Underlay. Now you can add your view specific tags, annotations, symbols, detail lines, etc. on top of the model. Unfortunately your lighting, furniture, electrical and other families will also be greyed out. If you need to show some model elements Normal then it's on to the next approach.
Visibility/Graphics Halftone: Duplicate your Proposed Floor Plan view (without Detailing) This is done by right clicking on your floor plan view in the project browser and selecting Duplicate. Now go to the view's Visibility/Graphic Overrides (VG). Under Model Categories select ALL. Now unhighlight Electrical Fixtures and Lighting Fixtures and check the Halftone box for one of the highlighted categories. Notice all the highlighted categories are now set to halftone. Click OK. You now have a floor plan background for your lighting and electrical work. Do the same for Detail Items, Electrical Equipment, Plumbing Fixtures, Furniture, Structural Framing, etc. for other disciplines. Go to View... Save as View Template... and you can save these changes to a View template for use in all your projects. To further configure View Templates go to Settings... View Templates.
To transfer View Templates and other standards from your project to a template file see Jay Polding's Importing Wall Styles.
Display Model As Underlay: The easiest way is to Duplicate your Proposed Floor Plan view (without Detailing) This is done by right clicking on your floor plan view in the project browser and selecting Duplicate. Now go to the View's Properties and you'll notice a Display Model parameter. By default this is set to Normal. Switch this to As Underlay. Now you can add your view specific tags, annotations, symbols, detail lines, etc. on top of the model. Unfortunately your lighting, furniture, electrical and other families will also be greyed out. If you need to show some model elements Normal then it's on to the next approach.
Visibility/Graphics Halftone: Duplicate your Proposed Floor Plan view (without Detailing) This is done by right clicking on your floor plan view in the project browser and selecting Duplicate. Now go to the view's Visibility/Graphic Overrides (VG). Under Model Categories select ALL. Now unhighlight Electrical Fixtures and Lighting Fixtures and check the Halftone box for one of the highlighted categories. Notice all the highlighted categories are now set to halftone. Click OK. You now have a floor plan background for your lighting and electrical work. Do the same for Detail Items, Electrical Equipment, Plumbing Fixtures, Furniture, Structural Framing, etc. for other disciplines. Go to View... Save as View Template... and you can save these changes to a View template for use in all your projects. To further configure View Templates go to Settings... View Templates.
To transfer View Templates and other standards from your project to a template file see Jay Polding's Importing Wall Styles.
Thursday, March 16, 2006
Revit's 16 lineweights
Revit has 16 lineweights. They say that the lineweights should be constant no matter what scale your drawing is at. We've found that's not always true. Go to Settings... Lineweights... and you'll notice that Revit has lineweights setup for 6 View scales from 1" = 1'-0" to 1/32" = 1'-0". Well what happens if you have a drawing at 1:50? Revit uses the closest thing (1/32" in this case). The good news is that you can ADD scales that Revit doesn't have setup. The bad news is you'll have to plot the 16 lineweights after you've setup your new scale and compare them with the default scales to get the settings right.
Maybe in a future release Autodesk will setup their default.rte file with the appropriate lineweights for all default scales.
Maybe in a future release Autodesk will setup their default.rte file with the appropriate lineweights for all default scales.
Wednesday, March 15, 2006
Shared Parameters
Did you add a parameter to a family but when you loaded the family into your project the new parameter won’t schedule or show up in your tags? You have to make it a Shared Parameter.
Creating the Shared Parameter File:
1. While in Revit (doesn't matter if you're in a family or project file) go to File... Shared Parameters... Create... give the txt file a name. This shared parameter file can be used on all your office's projects if you wish. Now Create Group... and add parameters you want to see in schedules or tags. The Shared Parameter file is now loaded into your Revit session for use in other family or project files.
Adding the shared parameter to your family and project files:
1. While in your family editor go to Family Types... Add Parameter... Shared Parameter... and Select your new parameter. Now while in your project file go to the schedule you want the parameter to show up in and go to View Properties... Fields... Add Parameter... Shared Parameter... and Select your new parameter.
2. If you're adding a parameter to your tags... While in your project file go to Settings... Project Parameters... Add... Shared Parameter... and Select your new parameter. Don't forget to check which family category to apply the Shared Parameter to.
If you exit all your Revit files but leave Revit running you will see that under File... Shared Parameters your shared parameters file is still loaded for use in other family or project files.
For more on Shared Parameters search Steve Stafford's RevitOpEd.
Creating the Shared Parameter File:
1. While in Revit (doesn't matter if you're in a family or project file) go to File... Shared Parameters... Create... give the txt file a name. This shared parameter file can be used on all your office's projects if you wish. Now Create Group... and add parameters you want to see in schedules or tags. The Shared Parameter file is now loaded into your Revit session for use in other family or project files.
Adding the shared parameter to your family and project files:
1. While in your family editor go to Family Types... Add Parameter... Shared Parameter... and Select your new parameter. Now while in your project file go to the schedule you want the parameter to show up in and go to View Properties... Fields... Add Parameter... Shared Parameter... and Select your new parameter.
2. If you're adding a parameter to your tags... While in your project file go to Settings... Project Parameters... Add... Shared Parameter... and Select your new parameter. Don't forget to check which family category to apply the Shared Parameter to.
If you exit all your Revit files but leave Revit running you will see that under File... Shared Parameters your shared parameters file is still loaded for use in other family or project files.
For more on Shared Parameters search Steve Stafford's RevitOpEd.
Friday, March 10, 2006
Family Visibility Control
When creating a door or other family we find that when loaded into a project we sometimes like to be able to switch on and off parts of the family but not the whole family. We have found three ways to accomplish this.
Visibility: We like to use symbolic lines to represent doors and windows in plan so we like to turn off the visibility of our model objects (glass and panel) in plan view. While in your family editor, this is simply done by selecting the object you want to hide and clicking on the Visibility button in your tool bar above. Note that this method is for turning off objects that you NEVER want to see in plan, section, elevation, or at specific Detail Levels.
Object Styles Subcategory: Another way to control the visibility of parts of a family is to setup new subcategories. While in your family editor goto Settings... Object Styles. From here you can add subcategories. Now select an object in your family and goto its properties. You'll notice that you can change the object's Subcategory. Load your new family into a project. You can now control the visibility of parts of your family GLOBALLY under Settings... Object Styles or in a SPECIFIC VIEW under View... Visibility/Graphics.
The Yes/No Parameter: While in the family editor goto Family Types... Add Parameter... And create a new Type parameter with Type (Yes/No). Now finish the Family Type and select any object in your family. Goto it's properties and you'll find a Visibility check box. At the far right there is a tiny grey box. Click on it and select your new Yes/No Parameter as the parameter that defines the visiblity. Now exit the element properties and go back into the Family Types. From here you can control the visibility of the object. Just add two new family types and uncheck the new parameter in one type while leaving it checked in the other type. The object will appear grey while in the family editor, but once you load the family into a project you will find that you can now switch on or off part of the family by switching between family types.
Visibility: We like to use symbolic lines to represent doors and windows in plan so we like to turn off the visibility of our model objects (glass and panel) in plan view. While in your family editor, this is simply done by selecting the object you want to hide and clicking on the Visibility button in your tool bar above. Note that this method is for turning off objects that you NEVER want to see in plan, section, elevation, or at specific Detail Levels.
Object Styles Subcategory: Another way to control the visibility of parts of a family is to setup new subcategories. While in your family editor goto Settings... Object Styles. From here you can add subcategories. Now select an object in your family and goto its properties. You'll notice that you can change the object's Subcategory. Load your new family into a project. You can now control the visibility of parts of your family GLOBALLY under Settings... Object Styles or in a SPECIFIC VIEW under View... Visibility/Graphics.
The Yes/No Parameter: While in the family editor goto Family Types... Add Parameter... And create a new Type parameter with Type (Yes/No). Now finish the Family Type and select any object in your family. Goto it's properties and you'll find a Visibility check box. At the far right there is a tiny grey box. Click on it and select your new Yes/No Parameter as the parameter that defines the visiblity. Now exit the element properties and go back into the Family Types. From here you can control the visibility of the object. Just add two new family types and uncheck the new parameter in one type while leaving it checked in the other type. The object will appear grey while in the family editor, but once you load the family into a project you will find that you can now switch on or off part of the family by switching between family types.
Subscribe to:
Posts (Atom)