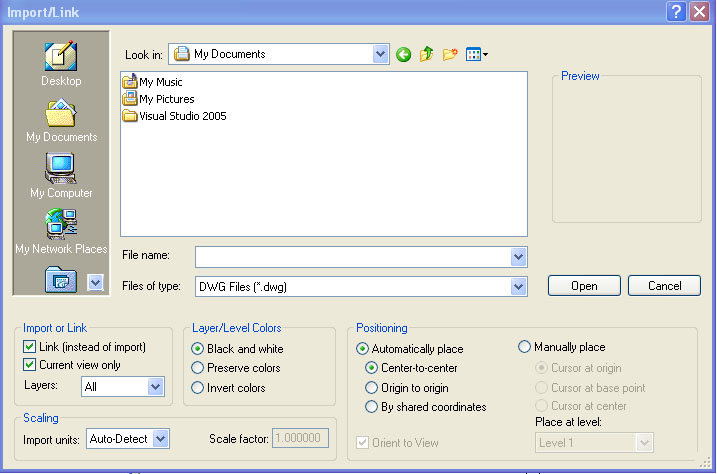
We quite often import survey data into Revit from DWG files given to us by the surveyor. Here are a few tips to consider when importing (and exporting) surveys.
1. Under File... Import/Link... CAD Formats... If you check "Link (instead of import)" you're keeping the project file size smaller. If you want to import the survey later you can always Import under File... Manage Links.
2. If you check "Current view only" your survey will only show in the active view (similar to detail lines). If you uncheck "Current view only" your survey will be visible in all of your views... elevations, sections, 3D views, etc (similar to model lines) and you'll have to adjust its visibility one view at a time.
3. Now let's say you've developed your site plan (with linked survey) and you want to export the data (including survey) back to DWG format. If you go to File... Manage Links... and Import your linked survey then it will export with the rest of your model to DWG format. If you don't Import your survey you'll notice that only revit components will export. The survey needs to be a part of the Revit model or Revit won't consider it when exporting your site plan to DWG.
UPDATE (09/27/06):
In Revit Building 9.1, when a DWG or DXF survey file is imported with the Current View Only checkbox checked, you cannot select the DWG/DXF instance to create a terrain model from the instance like you could with 9.0 and earlier versions. So imported data to be used for creating a toposurface must be imported with the Current View Only checkbox cleared. Thanks to Wes Macaulay on AUGI for posting this issue. Doesn't look like Autodesk is going to change this behavior.
This blog will highlight some of the common questions and cool tips found in the process of transitioning our office to Revit. This site is not sponsored or endorsed by, or affiliated with, Autodesk, Inc.
Showing posts with label DWGs. Show all posts
Wednesday, September 27, 2006
Tuesday, August 22, 2006
The Revit Experiment III
Translating standard details from AutoCAD to Revit:
Now, you can import DWGs into Revit and not do anything else to them. You can also scan details and import them as images but we completely translated our details from PowerCADD to AutoCAD to Revit by way of DWG files so we could improve on their graphic quality once they were imported. Some things we noticed when importing DWGs:
1. Things that don't transfer well from AutoCAD to Revit include: text and leaders, dimensions, and hatch patterns. We typically remove dimensions, text, leaders and hatch patterns before we import DWGs into Revit.
2. We import (not link) the DWG into a Drafting View. If the "Link (instead of import)" option was checked when you imported the DWG you'll have to go to File... Manage Links... Import if you want to explode the dwg.
3. After importing a DWG we explode the detail. When you explode a DWG, Revit generates new (often unwanted) linestyles and names them according the the layer each object was originally assigned to. We typically reassign the imported linestyles to linestyles we created in Revit. We then add Revit's dimensions, text, leaders, and filled regions. When we are done we purge the unwanted linestyles that were imported from our DWG files when we exploded the DWG (File... Purge Unused).
4. Some might argue that you can PICK lines but we find exploding and reassigning linestyles much faster. By PICK lines I mean that you can place Revit Detail lines by essentially tracing over the imported DWG with the PICK lines tool.
5. After you get some experience translating a few details you should decide if re-creating a detail in Revit is faster than importing the DWG... might be for simpler details.
6. Non-ploting layers like Defpoints are not available in Revit.
7. If you save all of your roof details (as an example) into one project file you can later import these drafting views into any project you're working on. (from your project file just goto File... Insert from File... Views to import drafting views you've generated in other projects)
8. If you decide to import a DWG and you don't want to go through the trouble of translating it to a Revit detail consider setting up your DWG Import Settings to preserve lineweights (File... Import/Export Settings... Import Lineweights DWG/DXF).
Subscribe to:
Posts (Atom)
