Monday, August 28, 2006

Wall Layer Wrapping Control

Let's say you've set your wall type parameter "Wrapping at Inserts" to Both because you want the exterior and interior finishes to wrap (as shown below).


But you'll notice that by default Revit will wrap your layers to the centerline of the wall. I just discovered that you can adust where the wall wraps to. First thing you have to do is open the door (or other) family and add a reference plane (as shown below). Now select that reference plane and make sure that under its properties you change the Wall Closure parameter to TRUE. Lastly, add a dimension (like say 2 inches) and lock the dimension so that your reference plane is always 2 inches from your face of wall.


Now load your door family into a project and place it in a wall. Make sure the wall's Wrapping at Inserts parameter is set to Both. You'll notice that you can now control the location of wall layer wrapping.


You can also add a second reference plane to control exterior and interior wall layer wrapping separately.

Wednesday, August 23, 2006

Cost Estimating

There are 3 ways we've found to estimate the cost of a project in Revit.

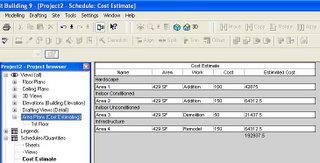
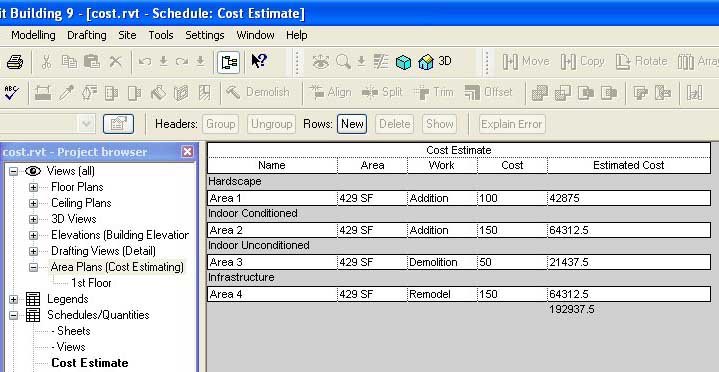
If you want to estimate the total cost of the project per square foot then setup an Area Plan scheme and Area schedule:

1. Goto Settings... Room and Area Settings... Area Schemes... New and add a scheme called Cost Estimating.
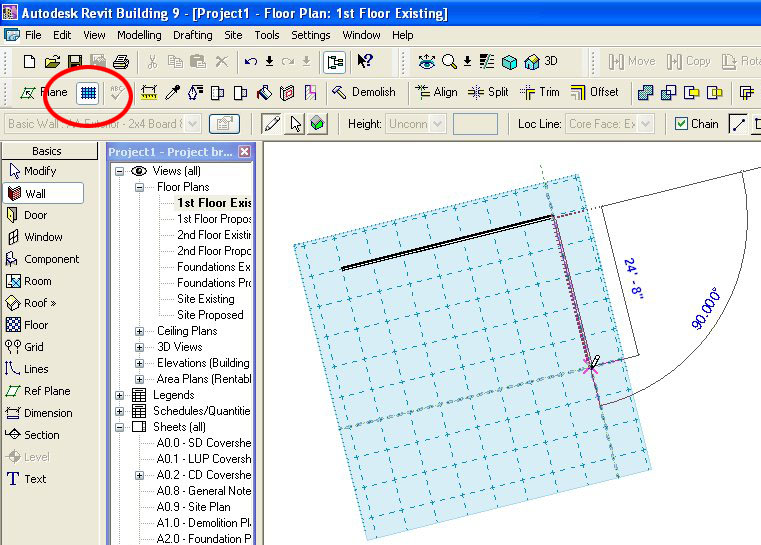
2. Goto View... New... Area Plan... Type... Cost Estimating... and break the project down into areas of differing cost per square foot.
3. To estimate the total cost goto View... New... Schedule/Quantities... Areas (Cost Estimating) and start adding the parameters you need to estimate the total cost.
4. You'll have to add a Calculated Value called "Estimated Cost" with a formula that looks something like (Area * Cost / 1 SF) so you can total the cost of each area.


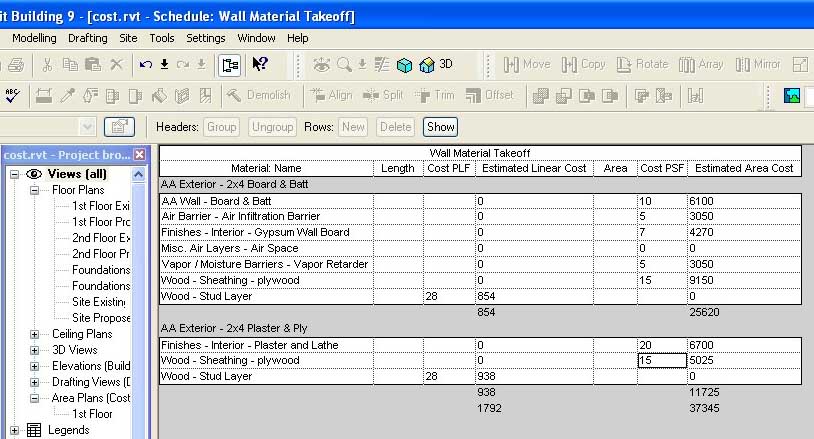
If you want to estimate the total cost of the project by materials used then setup one of Revit's new Material Takeoff Schedules:

1. Some materials are estimated in Cost Per Linear Foot, some in Cost Per Square Foot, some in Cost Per Cubic Yard so I would first setup new project parameters for each estimate (Cost PLF & Cost PSF).
2. To calculate the total cost of materials goto View... New... Material Takeoff... Walls and start adding the parameters you need to calculate the cost of materials used in the walls.
3. You'll have to add a Calculated Value called "Estimated Area Cost" with a formula that looks something like (Area * Material: Cost PSF / 1 SF) so you can total the cost of material measured by area... (Length * Material: Cost PLF / 1') for "Estimated Linear Cost."
4. Now you can type in the cost for each material in the schedule. If you goto Setting... Materials... Identity you can also add a cost to each material here.


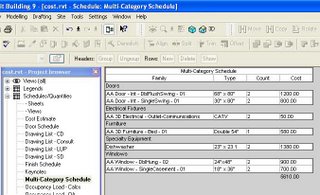
If you want to estimate the total cost of the project by unit cost then setup a Multi-Category Schedule:

1. To calculate the total cost of the project (by unit cost) goto View... New... Schedule/Quantities... Multi-Category and start adding the parameters you need to calculate the cost of all elements used. If you goto the Type Properties of each door, window, wall type, etc. you can also set a cost per unit here.
2. Now you can type in the cost for each material in the schedule.
3. Do not use Material Takeoff Schedule for estimating the total unit cost of doors and windows. Only use Material Takeoff Schedules when you want to schedule every material that is used in the door/window family separately.

If you want to do cost estimating outside of Revit you might try exporting the Revit model as an ODBC and importing the database into Timberline. Haven't tried it yet myself.

Tuesday, August 22, 2006

The Revit Experiment III


Translating standard details from AutoCAD to Revit:

Now, you can import DWGs into Revit and not do anything else to them. You can also scan details and import them as images but we completely translated our details from PowerCADD to AutoCAD to Revit by way of DWG files so we could improve on their graphic quality once they were imported. Some things we noticed when importing DWGs:

1. Things that don't transfer well from AutoCAD to Revit include: text and leaders, dimensions, and hatch patterns. We typically remove dimensions, text, leaders and hatch patterns before we import DWGs into Revit.

2. We import (not link) the DWG into a Drafting View. If the "Link (instead of import)" option was checked when you imported the DWG you'll have to go to File... Manage Links... Import if you want to explode the dwg.

3. After importing a DWG we explode the detail. When you explode a DWG, Revit generates new (often unwanted) linestyles and names them according the the layer each object was originally assigned to. We typically reassign the imported linestyles to linestyles we created in Revit. We then add Revit's dimensions, text, leaders, and filled regions. When we are done we purge the unwanted linestyles that were imported from our DWG files when we exploded the DWG (File... Purge Unused).

4. Some might argue that you can PICK lines but we find exploding and reassigning linestyles much faster. By PICK lines I mean that you can place Revit Detail lines by essentially tracing over the imported DWG with the PICK lines tool.

5. After you get some experience translating a few details you should decide if re-creating a detail in Revit is faster than importing the DWG... might be for simpler details.

6. Non-ploting layers like Defpoints are not available in Revit.

7. If you save all of your roof details (as an example) into one project file you can later import these drafting views into any project you're working on. (from your project file just goto File... Insert from File... Views to import drafting views you've generated in other projects)

8. If you decide to import a DWG and you don't want to go through the trouble of translating it to a Revit detail consider setting up your DWG Import Settings to preserve lineweights (File... Import/Export Settings... Import Lineweights DWG/DXF).

Monday, August 21, 2006

The Revit Experiment II


Using Revit's 2D Drafting tools:

Because beginners are not completely familiar with all of Revit's tools and because they are often faced with a deadline, beginners will likely rely on detail lines and filled regions to piece together plans, sections, and elevations for their first few projects. This isn't necessarily a bad habit as long as they are using detail lines and not model lines (detail lines are view specific but model lines will show up everywhere). The Revit 3D model is just a place to start. Even advanced users use detail lines, filled regions, and detail components to refine their drawings. Revit will start your drawings but you have to finish them.

Downloading Revit content (family files) from the internet:

BIMWorld is developing BIMLibrary a centralized, standardized and universally accessible 3D CAD models database for the international AEC end user community. Read the article here.

We find that while we can download a lot of content from the internet we usually have to tweak (and sometimes completely rebuild) the family files to get them to coordinate with our in-house standards with the exception of content downloaded from some manufacturer websites which is what I think BIMWorld is driving toward.

You can see content they've already created:
www.revitcity.com
library.bimworld.com

Wednesday, August 16, 2006

The Revit Experiment I

7 months into my blogger experiment and I realize that I've talked a lot about Revit tips and tricks but I haven't really talked much about our transition to Revit. This will be the first in a series of posts on (drum roll).... The Revit Experiment.

In my first two years of using Revit I was using it almost exclusively for photo realistic rendering. I enjoyed setting up lighting and rendering mostly for interiors. The office I worked for didn't use Revit for developing working drawings but I do remember wishing that I could add text to linestyles (for phone, elec, gas, etc) and I remember having trouble understanding phases but I got a lot of help from users on Zoogdesign (now AUGI).

After two years I moved on to another office (a branch office with all of 4 staff) that was using MACs but was considering a move to PCs. So for a few months I learned how to use PowerCADD. The office eventually moved on to PCs and we used AutoCAD for a short time. When I mentioned that I had Revit experience the office bought a seat of Revit and I showed them what one could do with it, but I hadn't any experience doing working drawings in Revit... yet. In one year I've learned what I had to to develop working drawings, we've managed to build up some Revit content, we've organized our templates, and we are successfully developing our details and other drafting standards transfered from PowerCADD to AutoCAD to Revit. I will go into this in future posts. Now we are putting all of our projects into Revit.

I can't say it's been the smoothest ride. Transitioning from PowerCADD to AutoCAD to Revit on all the workstations meant resolving plotting problems every other day. This doesn't plot on the correct size sheet, that doesn't plot in the correct orientation, etc. Getting our plotter drivers properly configured has finally settled down, but I'm sure we'll have to grapple with this everytime we build a new PC.

Meeting once a week for an in-house Revit class has been very beneficial. Most beginners don't really know what questions to ask until they start using the software. Preparing content for a weekly in-house Revit class is a good idea but don't restrict yourself to any particular content. Users may already have questions prepared if they are truely interested in the software. Giving users room to try things, differently than you would, is also a good idea. Faced with a new program beginners sometimes find creative solutions to difficult problems. Supplimenting your in-house classes with classes offered by a reseller or Autodesk is highly recommended.

To be continued...

Tuesday, August 15, 2006

More Keyboard Shortcuts

1. Hold the Delete key and delete items one-by-one by clicking on them.

2. Hold the Ctrl key and drag an object to copy it to a new location.

3. Select an object and Alt+Enter to edit the Element properties.

4. When placing an object next to an angled line or wall the spacebar will align the object to the line or wall.

Friday, August 11, 2006

Revit's Drafting Machine

Overlooked by many beginners... For those of you who remember using drafting machines mounted to a drafting table you'll find a similar tool in Revit. Just turn on your Workplane (blue grid icon), set the spacing of its grid, and rotate the workplane to any angle you wish. Now any lines or walls that you draft will snap to the gridlines of your workplane. I recommend you use this feature if a wing of your building is not orthogonal.

Thursday, August 10, 2006

A few interesting features

1. Draw an arc (wall or line doesn't matter). Goto its properties and you can check "Center Mark Visible" if you need to dimension to the center point of an arc.

2. Callout a dimension and go to the dimensions properties... Edit/New... and play around with the Read Convention parameter. You'll notice you can now orient dimension text.

3. Shift + Nudge moves 10 times as far as Nudge.

4. Highlight Sheets (all) in your project browser. Now hold down Num Lock and press the Asterisk (*) key... or hold down Num Lock and press the minus (-) key. You'll notice the Sheets tree expands and collapses.

Monday, August 07, 2006

Autodesk University Blog

For those of you interested in following events at Autodesk University 2006 Joseph Wurcher's blog is devoted to a behind-the-scenes look at this year's conference.

Thursday, August 03, 2006

Press + Drag

Do you ever accidentally drag a wall or other model object across the screen when you didn't intend to move it? That's probably because the Press + Drag option is checked in your options bar.

It might be nice if Revit would let you pick and choose which model and annotation objects can be moved with the Press + Drag option. I usually keep this checked for moving furniture, fixtures, and especially annotations but I do once in a while accidently drag walls or other model objects resulting in numberous warning messages.

Wednesday, August 02, 2006

Auto Dimension Options

Select the Dimension tool. In the options bar "Pick: Entire Walls" and select the "Options" button.
Select an exterior wall and you'll notice that you can now dimension the windows, doors, grids, and intersecting walls along the entire length of a wall.