I'll be in Vegas all next week at Autodesk University 2006. I've got a pretty full schedule but you might find me at the Revit Mixer or the Building Industry Party. Shoot me an email if you'ld like to meet up. I'll share what I can when I get back.
Everyone have a great Thanksgiving!
Wednesday, November 22, 2006


Thursday, October 26, 2006
Revit Template Sharing
If you haven't already joined the AUGI Revit forum here is yet another reason to join.
Edward Borg of Precision Drafting LLC has a dedicated FTP site for sharing cool Revit Project Templates and Families. You'll also find a Revit model of Calatrava's Turning Torso project in Malmö, Sweden. See how it was modelled.
Edward Borg of Precision Drafting LLC has a dedicated FTP site for sharing cool Revit Project Templates and Families. You'll also find a Revit model of Calatrava's Turning Torso project in Malmö, Sweden. See how it was modelled.

1. Join Augi
2. Login
3. Browse the Revit Template Sharing thread
FTP Details:
Host name- precisiondraftingllc.com
User name: revit
Password: 09revit!
Wednesday, October 25, 2006
Linking building and site
This is the procedure we use for linking building and site.
1. Once you have your building(s) modelled start a new project... Import your survey(dwg) into the new project and generate your toposurface from your imported instance.
2. Link your building(s) into your new site model and adjust their elevation and orientation so they are properly located in the topography. Do not relocate your topography. The topography is probably already oriented to true north and you'll want to preserve this orientation for rendering accurate sun angles.
3. Once your building(s) are located, place any building pads you need and make sure the elevations of your building(s) are where you want them. Now you're ready to share coordinates.
4. While in your site model goto Tools... Shared Coordinates... Publish Coordinates... and select your building(s) one at a time. This tool will share the coordinates of your site model (which is oriented correctly) with your imported building(s). Each building you select will require a named location. The default is Internal.
1. Once you have your building(s) modelled start a new project... Import your survey(dwg) into the new project and generate your toposurface from your imported instance.
2. Link your building(s) into your new site model and adjust their elevation and orientation so they are properly located in the topography. Do not relocate your topography. The topography is probably already oriented to true north and you'll want to preserve this orientation for rendering accurate sun angles.
3. Once your building(s) are located, place any building pads you need and make sure the elevations of your building(s) are where you want them. Now you're ready to share coordinates.
4. While in your site model goto Tools... Shared Coordinates... Publish Coordinates... and select your building(s) one at a time. This tool will share the coordinates of your site model (which is oriented correctly) with your imported building(s). Each building you select will require a named location. The default is Internal.
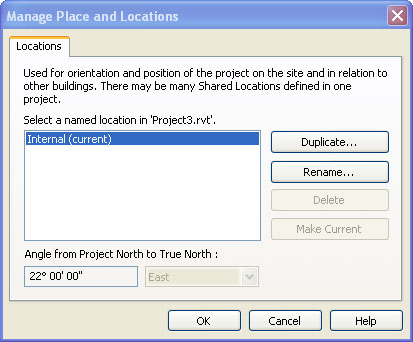
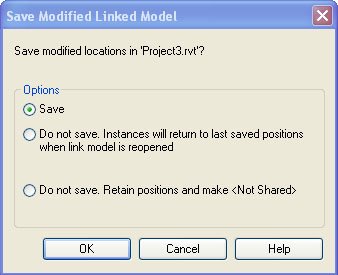
5. Save your site model. A dialog box will popup 'Save modified locations in 'Project.rvt' Go ahead and Save. You can also go to File... Manage Links... Revit... Save Locations. This procedure will open your linked model and save the new location into the linked project file but it won't affect any of your existing views in the building project file so not to worry.
6. Now that you have shared coordinates let's say you want the proper elevation to show in the levels of your building project file. While in your building project file just select a level... goto its properties... Edit/New... and change the Elevation Base parameter from Project to Shared.
7. We will often link the topography model back into the original building model for representing the topography accurately in sections and elevations. When you import the topography back into your building model make sure you Automatically Place... By Shared Coordinates. Your topography will import right where we want it to now that the two projects are sharing coordinates.
For more on Project Positioning see Steve Stafford's Revit OpEd.
Saturday, October 21, 2006
Instant Section Box
Scott Brown posted this on Zoogdesign ages ago but I thought it was pretty useful so I'll post it. While in plan view draw a floor plan callout... Go to any 3D view... Go to View... Orient... To Other View... and select your floor plan callout from the list of views. Rotate your view and you'll notice it's an instant section box. Very cool.
Friday, October 20, 2006
An ArchiCAD Blogger
Miguel Krippahl of Portugal is an ArchiCAD user and blogger who wants to know where are the ArchiCAD blogs are so if you find one or want to start one drop him a line.
Thursday, October 19, 2006
Autodesk Impression
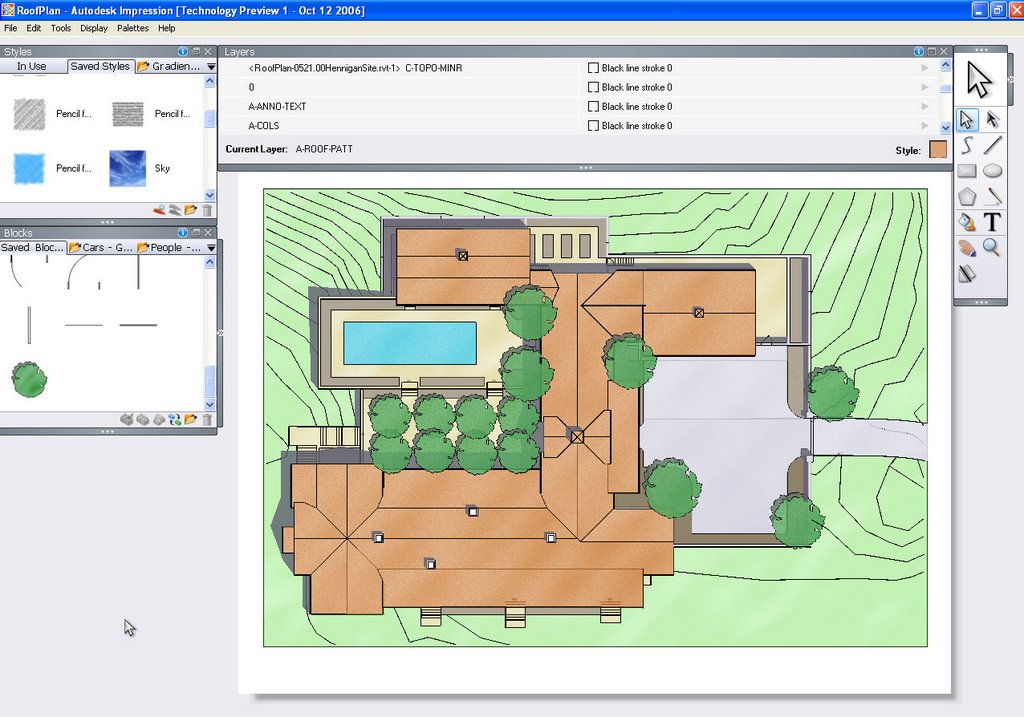
Matt Rumbelow reports on his blog The Digital Architect that Autodesk Impression is now available for download. I've attached an image of one of our projects exported From Revit Building to dwg... imported into Impression... and rendered using out of the box tools. If you know photoshop, using this software is a snap.
Tuesday, October 17, 2006
A builder's perspective on BIM
Contractor's are starting to take a serious look at the BIM movement. If you're curious about what they're up to (bim) x is a new blog with a focus on BIM for contractors. Laura Handler is a Building Information Modeller with Tocci Building Corporation.
Friday, October 13, 2006
Building Pad Tips
A building pad will cut the topography down or raise topography up to the elevation you need for cut and fill. The building pad tool does not allow for sloping pads yet. Here are a few tips for managing building pads.
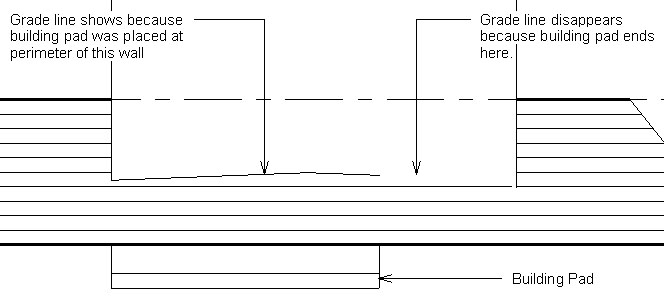
1. Let's say your grade slopes up to the building and you want to show (in your elevations) exactly where the grade meets the building. Well, Revit will not create this line for you and there is no way to join the geometry of a toposurface to a wall to get the grade line to show. So, you'll have to sketch a building pad along the perimeter of your building footprint to get the grade line at building footprint to show.
Hope these tips help you save hours of work trying to manage building pads.
1. Let's say your grade slopes up to the building and you want to show (in your elevations) exactly where the grade meets the building. Well, Revit will not create this line for you and there is no way to join the geometry of a toposurface to a wall to get the grade line to show. So, you'll have to sketch a building pad along the perimeter of your building footprint to get the grade line at building footprint to show.
Hope these tips help you save hours of work trying to manage building pads.
Tuesday, October 10, 2006
Revit Performance
Because we do a lot of high-end residential design most of our projects are very detailed and put Revit's performance to the test. We've noticed performance hits when modeling large topography surfaces and turning on shadows in any view. So we asked Autodesk a few questions. I thought I'd pass the answers on to Revit beginners (to improve performance turn off shadows and topography when not needed).
Questions:
Does Revit take full advantage of 64bit processors?
Does Revit take full advantage of dual processors?
Does Revit take full advantage of high-end graphics cards?
Answers:
Revit Building does not take full advantage of 64 bit of dual processors yet.
Multithreading with dual processors is supported only by the Radiate process with the AccuRender engine within Revit. However, since Windows can take advantage of this technology, the overall performance perception is better with dual processors, since Windows can distribute multiple applications to separate processors. For example, one processor will control Revit and the other one Outlook, leading to overall better workstation performance. Autodesk is working closely with Microsoft in this important update, and you should expect full support for this technology in the future.
High end cards are supported as long as drivers for Windows are available, but there are not Revit-specific video card drivers. The only option within Revit is to enable hardware acceleration, which can me done in the Setting menu, under Options > Graphics.
Most performance issues can be resolved by following the usual recommendations for keeping the project file size small and switching the 3G RAM option on your operating system. Please follow the recommendation on these solution documents:
Enabling 3GB feature for Windows® XP SP2
http://usa.autodesk.com/getdoc/id=TS1057453
Reducing file size of Revit® projects
http://usa.autodesk.com/getdoc/id=TS1057977
Revit® and Virtual Memory
http://usa.autodesk.com/adsk/servlet/ps/item?siteID=123112&id=8018971&linkID=3770375
In related news, Wes Macaulay on AUGI reports that the Section Box tool is more responsive in Revit 9.1. If you aren't already a member on AUGI I highly recommend signing up.
Questions:
Does Revit take full advantage of 64bit processors?
Does Revit take full advantage of dual processors?
Does Revit take full advantage of high-end graphics cards?
Answers:
Revit Building does not take full advantage of 64 bit of dual processors yet.
Multithreading with dual processors is supported only by the Radiate process with the AccuRender engine within Revit. However, since Windows can take advantage of this technology, the overall performance perception is better with dual processors, since Windows can distribute multiple applications to separate processors. For example, one processor will control Revit and the other one Outlook, leading to overall better workstation performance. Autodesk is working closely with Microsoft in this important update, and you should expect full support for this technology in the future.
High end cards are supported as long as drivers for Windows are available, but there are not Revit-specific video card drivers. The only option within Revit is to enable hardware acceleration, which can me done in the Setting menu, under Options > Graphics.
Most performance issues can be resolved by following the usual recommendations for keeping the project file size small and switching the 3G RAM option on your operating system. Please follow the recommendation on these solution documents:
Enabling 3GB feature for Windows® XP SP2
http://usa.autodesk.com/getdoc/id=TS1057453
Reducing file size of Revit® projects
http://usa.autodesk.com/getdoc/id=TS1057977
Revit® and Virtual Memory
http://usa.autodesk.com/adsk/servlet/ps/item?siteID=123112&id=8018971&linkID=3770375
In related news, Wes Macaulay on AUGI reports that the Section Box tool is more responsive in Revit 9.1. If you aren't already a member on AUGI I highly recommend signing up.
Wednesday, October 04, 2006
Materials in Families
When building your families you might notice there are many ways to apply materials to your solids. Here are 4 ways to apply materials and some reasons for using each.
Element Properties
The most obvious method is to extrude a shape... go to its properties and specify a material for your solid form in the Material parameter under the Materials & Finishes group.
Element Properties
The most obvious method is to extrude a shape... go to its properties and specify a material for your solid form in the Material parameter under the Materials & Finishes group.

The Paint Tool
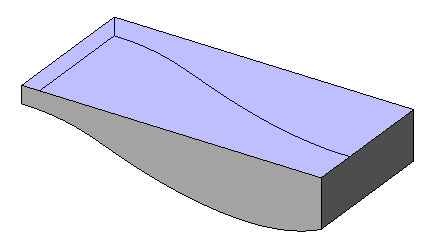
Goto Tools... Paint and you can also paint materials onto individual surfaces like the surface of a pool.
Goto Tools... Paint and you can also paint materials onto individual surfaces like the surface of a pool.
Material Parameters
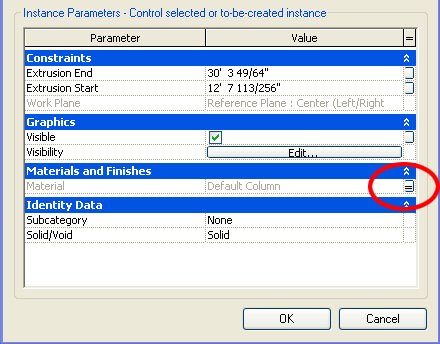
While in the Family Editor go to Family Types... Add Parameter... and specify a new parameter of Type "Material." Now associate your new parameter to the Material parameter in Element Properties of the solid form (click tiny grey button). Once loaded into a project go to the Family's properties... Edit/New. You can now change the material from Family Type to Family Type. This method is very useful if you're expecting the material to change depending on the Family Type.

By Category
Extrude a shape... go to its properties and set your material to "By Category." You'll notice a parameter called Subcategory. To add a custom Subcategory go to Settings... Object Styles. After you've created your custom subcategory go back to the elements properties and assign the Subcategory to your solid form. Now when you load your family into a project file you can control materials globally in Settings... Object Styles. This method is very useful if you want to control the palette of your project globally from Object Styles.
Extrude a shape... go to its properties and set your material to "By Category." You'll notice a parameter called Subcategory. To add a custom Subcategory go to Settings... Object Styles. After you've created your custom subcategory go back to the elements properties and assign the Subcategory to your solid form. Now when you load your family into a project file you can control materials globally in Settings... Object Styles. This method is very useful if you want to control the palette of your project globally from Object Styles.

Subscribe to:
Posts (Atom)