1. Once you have your building(s) modelled start a new project... Import your survey(dwg) into the new project and generate your toposurface from your imported instance.
2. Link your building(s) into your new site model and adjust their elevation and orientation so they are properly located in the topography. Do not relocate your topography. The topography is probably already oriented to true north and you'll want to preserve this orientation for rendering accurate sun angles.
3. Once your building(s) are located, place any building pads you need and make sure the elevations of your building(s) are where you want them. Now you're ready to share coordinates.
4. While in your site model goto Tools... Shared Coordinates... Publish Coordinates... and select your building(s) one at a time. This tool will share the coordinates of your site model (which is oriented correctly) with your imported building(s). Each building you select will require a named location. The default is Internal.

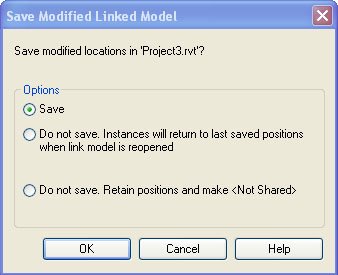
5. Save your site model. A dialog box will popup 'Save modified locations in 'Project.rvt' Go ahead and Save. You can also go to File... Manage Links... Revit... Save Locations. This procedure will open your linked model and save the new location into the linked project file but it won't affect any of your existing views in the building project file so not to worry.
6. Now that you have shared coordinates let's say you want the proper elevation to show in the levels of your building project file. While in your building project file just select a level... goto its properties... Edit/New... and change the Elevation Base parameter from Project to Shared.
7. We will often link the topography model back into the original building model for representing the topography accurately in sections and elevations. When you import the topography back into your building model make sure you Automatically Place... By Shared Coordinates. Your topography will import right where we want it to now that the two projects are sharing coordinates.
For more on Project Positioning see Steve Stafford's Revit OpEd.
3 comments:
Step 7, you say "we often link the topo" back to the building model..., but then also say "when you import the topo...remember to choose...shared..."
What are the actual steps involved in Step 7? Linking or Importing?
I'm sorry but as helpful as this beginners step by step tut is (I've found nothing like it online before), it still leaves out steps and has questionable directions. Which is probably why no matter how often I try this something fails. I've gotten closer than ever before following your directions and am thankful for this blog, but I'm missing a couple of the brain cells needed to fill in the gaps. A beginners tut has to assume we don't know the typical steps daily users of the software will know.
Thanks Jon,
I agree, beginner's step-by-step should be more verbose and include screenshots.
And a lot has changed in 10 years.
Step 1) should be amended to LINK not IMPORT dwg survey, Importing increases file size and does not permit updating the dwg file.
Step 7) What I meant to say is that I LINK the site model back into the building model "by shared coordinates." so I can see where the site's topo-surface intersects the building model.
Topo-surface can be generated from an Import Instance (ie. the survey dwg)
Hope that helps clarify.
Thank you for the update David, and for keeping an eye on a 2006 post. Much appreciated.
Post a Comment